A code-compliant retaining wall — up to 30 inches, done right.
A small retaining wall can solve real drainage and grading problems in your yard for a fraction of pro install cost. But it's the one DIY project on this site with real safety stakes — the difference between a wall that stands for 25 years and one that fails catastrophically is the leveling pad, the drainage system, and respecting the 30" hard stop.
The 30-inch hard stop matters
Every other DIY guide on this site is about quality. This one is about safety too. A 4-foot retaining wall holding back saturated soil exerts thousands of pounds of lateral force, and the failure mode is sudden — kid's playing nearby, wall lets go. Arizona jurisdictions cap homeowner-built retaining walls at 30" (some allow 36") for a real engineering reason. Above that, an engineer designs the wall, specifies geogrid reinforcement back into the slope, sizes the leveling pad to the soil bearing, and stamps the drawings. We're not gatekeeping; we're keeping the wall up.
Why the drainage system is everything
A retaining wall doesn't fail because of the soil weight. It fails because of the water. Dry soil weighs roughly 100 lb/cu ft and sits at a stable angle. Saturated soil — soil that's been wet by monsoon rain and can't drain — weighs 120+ lb/cu ft AND applies hydraulic pressure like a fluid. That hydraulic pressure is what pushes walls over. The drainage gravel + geotextile fabric + perforated drain pipe behind the wall is the system that prevents that. Skip it and your wall will tell you about it within 2-3 monsoon seasons.
When you should hand this one to us
- Any wall over 30" finished height. Always. No exceptions.
- Any wall with a 'surcharge load' on top — driveway, parking area, pool, structure, anything that adds weight to the retained zone. Even a 24" wall holding back a driveway needs engineering.
- Tiered/terraced walls where the tier separation is less than 2x the lower wall height — they engineer as one tall wall.
- Walls integrated with steps, planters, pool decks, or built-in seating — design coordination matters.
- Any wall where 'we'll just push it back into place' is something a previous owner already tried.
Tools you'll need
- Plate compactorRentable3,000 lb force class. Compacts the leveling pad — the foundation of the wall.$70/day rental
- Mini-excavator or trenching shovelRentableFor walls over 15 linear ft, rent a small excavator (one day, saves your back). Under 15 ft, a sharp trenching shovel works.$250/day excavator · $45 shovel
- Block splitter or wet sawRentableCuts retaining-wall block cleanly. Splitter is faster; wet saw is cleaner.$45/day splitter rental
- 4-ft level + torpedo level + line levelEvery block has to be level. The leveling pad has to be FLAT. Errors compound vertically.$60
- Rubber mallet + dead-blow hammerSeating blocks without chipping faces.$40
- Construction adhesive gun + tubes (PL Premium 8x or SRW)Bonds the capstone course and any decorative block.$60 (gun + 4 tubes)
- Wheelbarrow + spade + landscape rakeStandard kit. You'll move 1-2 tons of gravel.$140
- Tape measure + marking paint + stakes + string lineLayout and grade reference.$35
Rentable items are available at most Home Depot / Sunbelt locations by the day.
Materials
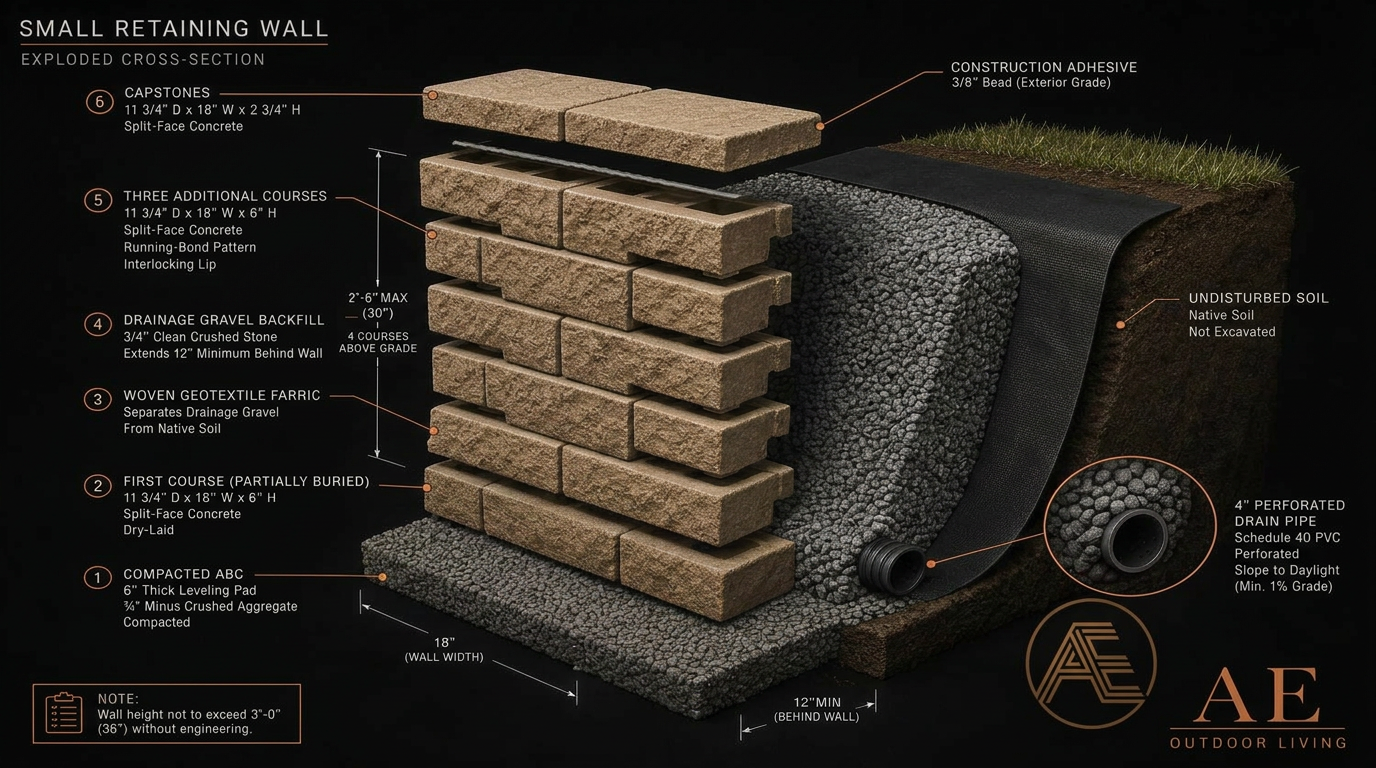
- Retaining-wall block (split-face concrete, with interlocking lip)Belgard Anchor Diamond, Pavestone RockWall, or Allan Block. Most blocks are 11-3/4"D × 18"W × 6"H. The interlocking lip on the back is what makes it a real retaining wall, not just a decorative wall.$3.50–$7 per block · 30-50 blocks per 15 linear ft of 30" tall wall
- CapstonesFlat-top caps glued to the top course.$8–$14 per linear ft
- ABC (Aggregate Base Course)6" compacted leveling pad under the wall. NEVER skip this — directly on dirt is the #1 DIY retaining wall failure.$35–$50 per ton (need ~1 ton per 10 linear ft)
- 3/4" clean crushed drainage gravelBackfill DIRECTLY behind the wall, minimum 12" deep across the full height. This is what prevents hydraulic pressure from pushing the wall over.$30–$45 per ton (need ~1 ton per 8 linear ft of 30" wall)
- Woven geotextile fabricSeparates drainage gravel from native soil so the gravel doesn't get clogged with fines over time.$50 for 4×100 ft roll
- 4" perforated PVC drain pipe (sock-wrapped)Runs along the base behind the wall, sloped to daylight or to a drywell. Without this, water pressure builds and the wall bows.$8 per 10 ft section + fittings
- Polyurethane construction adhesivePL Premium 8x or SRW Liquid Cement Color. Bonds capstone course.$10 per tube
Realistic DIY material + rental cost for a 15 linear ft × 30" tall wall: $750-$1,200 in materials + ~$200 rental. Pro install for the same wall: $2,500-$5,000 depending on access and grading work.
- 01
Verify height stays under 30" (REAL hard stop)
Most Arizona jurisdictions allow homeowner-built retaining walls up to 30" tall (some up to 36") without engineered drawings or permits. ANYTHING OVER 30" needs an engineer's design, soil report, geogrid reinforcement, and a permit. The reason is real: a 4-foot wall holding back soil exerts thousands of pounds of lateral force and the failure mode is catastrophic. This guide covers up to 30" only. Over that, hand it to a pro.
- 02
Mark layout & call 811
Spray paint the wall location. Call Arizona 811. Retaining walls frequently cross irrigation, gas, and low-voltage runs.
- 03
Excavate the trench
Dig a trench the full length of the wall, 18" wide (wider than the block), and deep enough to (a) bury the entire first course of block AND (b) place 6" of ABC under it. For a 30" tall finished wall using 6" blocks: bury course 1, expose courses 2-4 + capstone = 6" buried + 4 courses × 6" exposed + 2" capstone = 32" finished height (close enough).
- 04
Compact the leveling pad
Place 6" of ABC in the trench. Compact in two 3" lifts with the plate compactor. Final pad must be DEAD LEVEL across its width (front-to-back) AND along its length, top-to-bottom. Use the 4-ft level repeatedly. This single layer is what separates a wall that stands plumb for 25 years from one that leans by year three.
- 05
Dry-lay the first course (buried)
Set the first course of blocks tight against each other, no adhesive. Use the rubber mallet to seat each block onto the leveling pad. Check level both directions on EVERY block. Adjust by adding or scraping ABC under any high or low block. This course MUST be perfect — every course above replicates its errors.
- 06
Backfill behind first course with drainage gravel
Lay woven geotextile fabric against the native soil cut. Place the 4" perforated drain pipe along the base, sock-wrapped or wrapped in fabric, sloped at minimum 1% to daylight or to a drywell. Backfill 12" of clean 3/4" gravel behind the first course of block, contained by the geotextile fabric.
- 07
Stack courses 2-4 with running bond
Each block bridges the seam below (running bond, like brick). The interlocking lip on the back of each block sits on top of the back of the block below — this gives the wall a natural setback (~1" per course) and locks it together mechanically. No adhesive needed between courses for blocks with interlocks. Check level on every block. Between each course, backfill another 12" of drainage gravel up to the new block height.
- 08
Top course adhesive + capstones
Apply a polyurethane masonry adhesive bead on top of the final course of block. Set capstones with a slight overhang (1-2") off the front face. Adhere — capstones are not interlocking and will get walked on / sat on, so they NEED to be glued.
- 09
Final backfill & restore grade
Top off drainage gravel up to about 6" below final grade. Wrap the geotextile over the top of the drainage gravel (this prevents soil from migrating down into the gravel). Backfill the last 6" with native soil or topsoil, restore grade behind the wall, plant or mulch as desired.
Pro tips from our crew
- The leveling pad is the wall. Get it dead level and dead compacted; everything above forgives nothing.
- Always dig out the existing slope so the wall sits on undisturbed soil, NOT recent fill. Fill compresses over time and your wall settles.
- Sock-wrapped (perforated wrapped in fabric) drain pipe is worth the extra $5 per 10 ft. Plain perforated pipe clogs with fines within 5 years; sock-wrapped lasts 20+.
- If your wall has corners, plan them carefully — most retaining wall systems sell a dedicated 'corner block' for 90° turns. Don't cut a regular block to make a corner; it weakens the course.
- For walls over 20 ft long, install a tier of geogrid between courses 2 and 3 — extends back 4-6 ft into the backfill. Doubles the wall's resistance to bowing. Manufacturers spec this on their data sheets.
- Slope native soil behind the wall AWAY from the wall in the top 6" so surface water sheds toward the yard, not toward the back of the wall.
Common DIY mistakes we get called to fix
- Building taller than 30" without an engineer. Not just illegal — actually dangerous. 4 ft walls can fail catastrophically.
- Skipping the 6" ABC leveling pad and setting block directly on dirt. Wall settles, leans, and bows within 2-3 years.
- No drainage gravel behind the wall, OR drainage gravel without geotextile fabric. Hydraulic pressure builds, fines clog the gravel, wall fails.
- No drain pipe at the base, OR drain pipe with no daylight outlet. The drainage gravel fills with water and the wall takes the full hydraulic load.
- Decorative-only block (no interlocking lip) used as a structural retaining wall. Won't hold soil — only fine for low garden borders.
- Capstones not adhered. Get knocked off by mowers, sat on by neighborhood kids, then disappear.
- Stacked-bond pattern (joints aligned vertically) instead of running bond. Wall is structurally weaker and visually amateur.
- Native soil as backfill behind the wall instead of clean gravel. Soil holds water against the wall and the wall fails the first monsoon season.
If your retaining wall starts feeling like more than a weekend, that's normal.
Retaining walls are the one DIY project where the safety stakes are real. If your wall is anywhere near 30" tall, has a load above it, or is tiered with another wall, hand it to us. We coordinate the engineering, the permit, and the build — and you get a wall that stands for 25 years instead of a rescue call after the next monsoon.
Common questions.
Wall over 30 inches, tiered, or holding back a driveway?
Anything above the 30-inch DIY ceiling — or any wall with a load on top of it — needs engineered design. We coordinate the engineering, permits, and build as a single contract.
Get a Wall QuoteWhy this is an investment, not a cost.
An AE backyard is engineered to add daily livability and long-term home value. We publish honest ranges and build to code with a licensed and bonded Arizona crew. AE provides project-specific workmanship and manufacturer-warranty information in the signed agreement. Website summaries are for planning only.
- Licensed, bonded & insured in Arizona. ROC 340966 (R-62) · ROC 341002 (R-3) · ROC 347738 (KA-5) · ROC 211530 (CR-21). Most Arizona contracting work valued at $1,000 or more — or requiring a permit — must be performed by a properly licensed contractor, subject to statutory exemptions. Verify the legal entity, license status, and classification with the Arizona Registrar of Contractors.
- Real ranges, itemized scope. You see materials, finishes, equipment models, and a line-item budget before you sign — not a one-line "pool — $90,000."