Build a paver patio that holds up to 15 Arizona summers.
A small backyard paver patio (under ~200 sq ft) is one of the most rewarding weekend DIY projects you can take on. It's also one of the easiest to do wrong — and we get called to rescue sunken, weed-jointed, sand-pumped patios constantly. This guide is the exact spec we use on installed jobs. Follow it and your patio will outlast the rest of your house.
The real Arizona paver patio spec
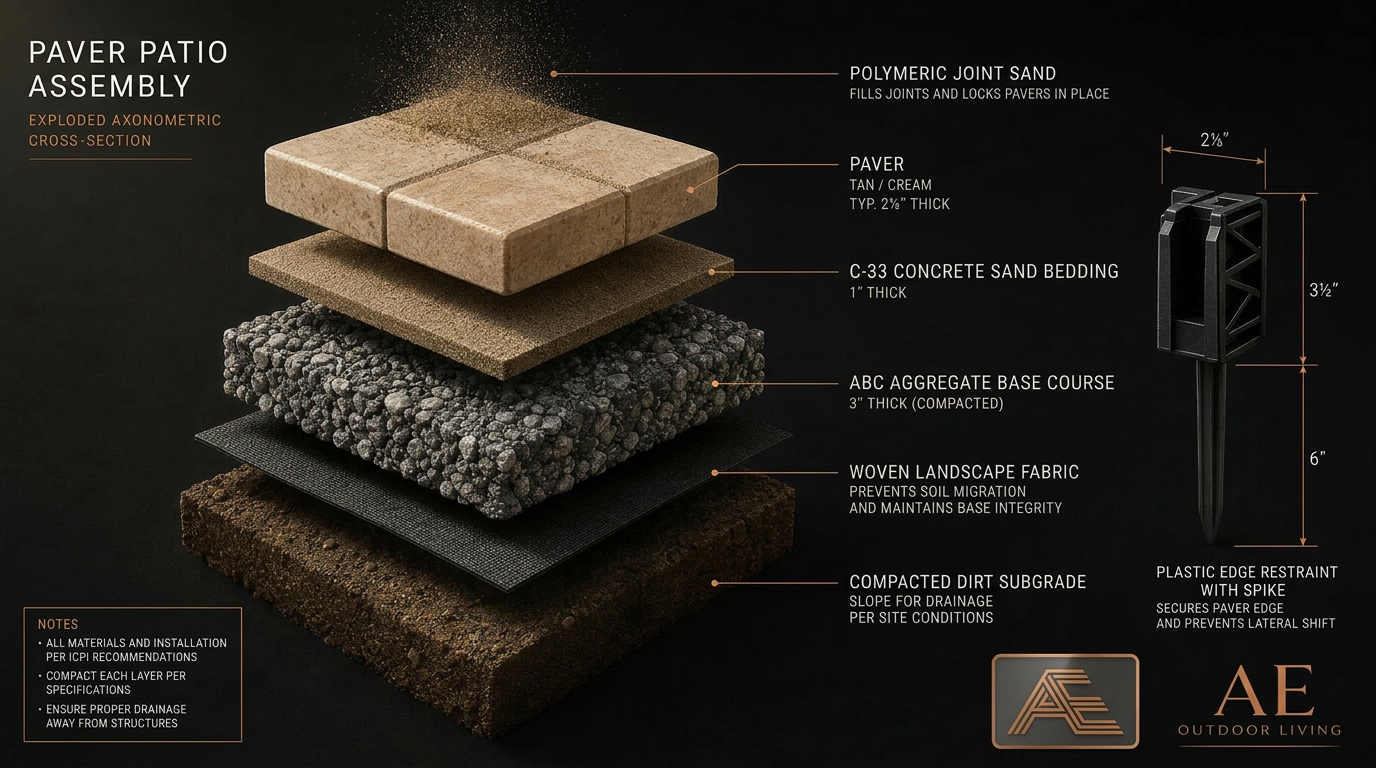
Forget what the YouTube algorithm tells you. The spec that lasts 25 years in Arizona sun and monsoon is: woven landscape fabric, 2-3 inches of compacted ABC (Aggregate Base Course), exactly 1 inch of C-33 concrete sand, the paver, polymeric joint sand, and a perimeter edge restraint. That's the whole list. Skip a layer and you've built a problem.
Why quarter minus is wrong (and why it's everywhere)
Quarter minus is the right base under artificial turf because it compacts hard but stays slightly porous for drainage. Under pavers it's a disaster: it doesn't lock up structurally the way ABC does (ABC has the full gradation from 3/4" stone down to fines that interlock under compaction), and it traps moisture against the sand bed. Every DIY paver settling job we rescue used quarter minus or DG as the base because that's what the box store guy recommended. ABC. Always ABC, for pavers.
When you should hand this one to us
- Patio over 400 sq ft — the labor curve gets steep fast.
- Anywhere a paver vehicle (driveway) will drive — different ABC depth (4–6"), different spec, real engineering call.
- Steps, raised seating walls, or a built-in fire pit integrated into the patio.
- Significant grade change — anything that needs a retaining wall to support the patio elevation.
- Existing slab in bad shape — demo + new sub-base is more equipment than most homeowners want to deal with.
Tools you'll need
- Plate compactor (vibratory)RentableMinimum 3,000 lb force class. Compacts base and seats pavers.Skipping this — using a hand tamper on more than 20 sq ft — is the #1 cause of paver settling in Arizona.$70/day rental · $700 buy
- Wet saw or paver splitterRentableWet saw with diamond blade for clean cuts; splitter for rough cuts on borders.$55/day rental · $250–$600 buy
- Rubber mallet (white, non-marking)Seats pavers without scuffing the face.$15
- Screed pipes (2× 1" EMT conduit, 10 ft)The two rails you screed your sand bed off. Get 1" EMT — sand bed = exactly 1".$12 pair
- Screed board (2x4, straight, 6–8 ft)Pulled across the screed pipes to level the sand bed.$8
- 4-foot level + string lineFor pitch (drainage) and edge alignment.$35
- Landscape rake + flat shovelSpreading and pulling base material.$50
- Wheelbarrow (6 cu ft contractor)You'll move 2–4 tons of base. A 4 cu ft homeowner barrow will break your back.$110
- Knee pads + work gloves + safety glassesYou'll thank yourself by hour two.$60
- Garden hose with mist nozzleFor activating polymeric joint sand.$30
- Leaf blowerClears polymeric sand off paver faces before activation. Skip this and you'll have hazy joints set into your patio forever.$80 (own one)
- Measuring wheel + tape measureLayout and material calc.$45
Rentable items are available at most Home Depot / Sunbelt locations by the day.
Materials
- ABC (Aggregate Base Course)Our canonical spec: 2–3" compacted for a patio. NEVER use quarter minus — that's a turf base, not a paver base.200 sq ft × 3" deep ≈ 2.5 tons. Order 3 tons to cover compaction loss.$35–$50 per ton delivered
- Paver bedding sand (concrete sand / ASTM C-33)1" bed, always. NEVER mason sand, NEVER play sand.$8–$12 per cu ft bag · $40/ton bulk
- PaversBelgard, Pavestone, Techo-Bloc, or Acker-Stone. Plan ~5% waste for cuts.$4–$9 per sq ft
- Polymeric joint sandAlliance Gator Maxx, Techniseal HP NextGel, or SRW EnviroSand. Locks joints, blocks weeds.$35–$50 per 50 lb bag (covers ~80 sq ft)
- Edge restraint (plastic L-channel + 10" spikes)Snap-Edge or Pave Edge Rigid. The reason perimeter pavers don't migrate. Non-negotiable.$8 per 8 ft section + spikes
- Landscape fabric (woven, NOT spun)Goes between subgrade and ABC. Stops fines from migrating up. Don't use spun garden fabric — it tears.$50 for 4×100 ft roll
- Paver sealer (optional, recommended)Surebond SB-1300 or Techniseal Natural Look. 12-month re-seal cycle in AZ sun.$80 per gallon (covers 150 sq ft)
Realistic all-in DIY material + rental cost for a 200 sq ft patio: $1,500–$2,800 depending on paver selection. Pro install for the same patio runs roughly $4,500–$7,000 — the delta is labor and equipment, not materials.
- 01
Layout & call 811
Mark your patio outline with marking paint. Call Arizona 811 (free) at least 2 business days before you dig — they'll mark gas, electric, water, and irrigation. Most DIY patio disasters start with a Saturday dig into a buried gas line.
- 02
Excavate to depth
Total dig depth = 1" sand + paver thickness + 3" ABC. For a typical 2-3/8" paver, that's about 6.5" below your finish height. Slope the subgrade 1/8" per foot away from the house — drainage is set here, not at the surface.
- 03
Subgrade compaction
Run the plate compactor over the bare dirt subgrade in two passes, perpendicular directions. If it's caliche, this is short; if it's the sandy soil from a recent fill, compact aggressively or you'll get post-install settling.
- 04
Lay landscape fabric
Woven fabric, edge-to-edge, lap seams 6". Goes under the ABC, not over it. This is the part most YouTube videos skip — and the reason their patios show 'tea bag' settling around tree roots two summers later.
- 05
Place and compact ABC base
Spread ABC in 1.5" lifts (do two lifts for a 3" total). Compact each lift separately. Light water mist between lifts helps the fines lock. Final compacted depth: 2-3" for a patio. Drag a 2x4 to confirm flatness and slope before moving on.
- 06
Set screed pipes & screed the sand bed
Lay your two 1" EMT pipes parallel, 5-6 ft apart, on top of the compacted ABC. Pour C-33 sand between them and screed it flush with the top of the pipes using your 2x4. Lift the pipes out, fill the channels with sand by hand, and DON'T walk on the screeded bed.
- 07
Lay pavers — start in a corner, work outward
Set pavers tight against each other (don't 'space' them — polymeric sand handles the joints). Tap each one with the rubber mallet to seat it. Check pattern alignment every 4-5 rows. Cut the perimeter last with the wet saw.
- 08
Install edge restraint
Snap the plastic L-channel against the outside row of pavers and drive 10" spikes through it into the ABC every 12". This is what stops your perimeter from migrating outward when the patio is loaded — without it, your edges spread by year two.
- 09
Sweep and compact pavers
Sweep coarse sand into the joints, then run the plate compactor over the entire patio (place a 1/4" rubber pad or sacrificial plywood under the plate to protect the paver faces). Two passes, perpendicular. This locks each paver into the bed.
- 10
Apply polymeric joint sand
Pour out polymeric sand, sweep it into all joints until full, then BLOW (leaf blower, low setting) every grain off the paver faces. Any haze left on the surface will set permanently. Then mist with a hose — light, repeated passes — until the surface stays wet for 30 seconds. The polymer activates and sets in 24 hours.
- 11
Cure & seal (optional)
Keep traffic off for 24 hours. After 30 days of curing, you can apply a paver sealer if you want richer color and easier maintenance. Re-seal every 12-18 months in AZ sun.
Pro tips from our crew
- Order 10% extra pavers. Cut waste is real, color variation between pallets is real, and a callback to the supplier mid-project will cost you a Saturday.
- Pavers come in 'cubes' on pallets. Pull from 3-4 cubes simultaneously and blend — single-cube laying creates visible color bands.
- Compact ABC in 1.5" lifts, not one big 3" lift. The plate compactor only fully consolidates the top 2" of any single lift.
- Slope AWAY from the house at 1/8–1/4 inch per foot. You set this in the subgrade, not at the surface.
- Polymeric sand activates with mist, not flood. A hard spray washes the polymer out and you end up with empty joints in 6 months.
- Work in the morning. By 11am in Arizona summer, polymeric sand starts to flash-cure before you've even watered it.
Common DIY mistakes we get called to fix
- Using quarter minus or decomposed granite as the base. Quarter minus is for under turf. Pavers need ABC.
- Skipping the plate compactor and 'tamping by foot.' Expect roughly 1" of settling within 2 years.
- Using mason sand or play sand for the bedding course instead of C-33 concrete sand. Mason sand holds water and creates a soggy bed.
- No edge restraint. The perimeter migrates outward, the field opens up, joints fill with weeds.
- Spun (non-woven) landscape fabric instead of woven. It tears during compaction and lets fines pump up through the base.
- Activating polymeric sand at noon in July. The surface flashes before the polymer wets through and you get hollow joints.
- Not calling 811. Phoenix Gas charges around $2,500 to repair a homeowner-cut service line — and that's before anyone's hurt.
- Setting screed pipes on raw dirt instead of compacted ABC. The 1" sand bed becomes 1" of dirt, sand, and uneven settling.
If your patio starts feeling like more than a weekend, that's normal.
Most homeowners who start one of these projects finish it. Some realize halfway in that the prep, the equipment rental, or the physical scale isn't worth their Saturday. No judgment — we built our business on doing it right the first time. If you'd rather hand it off (or you've started and want a clean takeover), send a few photos and we'll quote it honestly.
Common questions.
Patio over 400 sq ft? Steps, walls, or driveway?
Once the project grows past a weekend patio, the equipment and crew time start beating DIY economics. Send us photos and dimensions — we'll quote it honestly.
Get a Patio QuoteWhy this is an investment, not a cost.
An AE backyard is engineered to add daily livability and long-term home value. We publish honest ranges and build to code with a licensed and bonded Arizona crew. AE provides project-specific workmanship and manufacturer-warranty information in the signed agreement. Website summaries are for planning only.
- Licensed, bonded & insured in Arizona. ROC 340966 (R-62) · ROC 341002 (R-3) · ROC 347738 (KA-5) · ROC 211530 (CR-21). Most Arizona contracting work valued at $1,000 or more — or requiring a permit — must be performed by a properly licensed contractor, subject to statutory exemptions. Verify the legal entity, license status, and classification with the Arizona Registrar of Contractors.
- Real ranges, itemized scope. You see materials, finishes, equipment models, and a line-item budget before you sign — not a one-line "pool — $90,000."