The easiest paver project to start with — and the one that teaches you everything.
A 3-4 ft wide paver walkway from driveway to gate, porch to patio, or side-yard to back-yard is the best first paver project a homeowner can take on. Same spec as a real patio, smaller footprint, faster win. Get this right and a future patio is just more of the same.
Why a walkway is the perfect first paver project
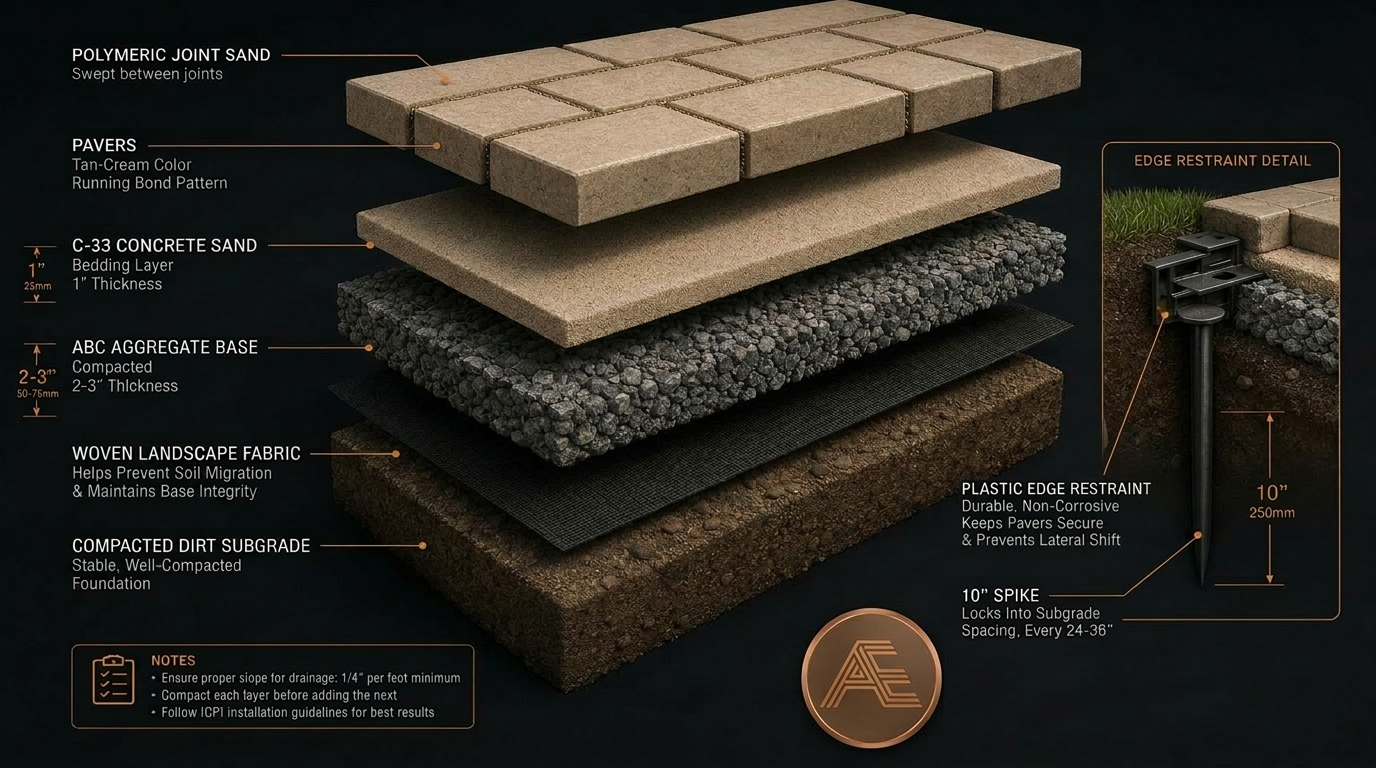
Small footprint, simple geometry, two weekends of work, and you bank every skill you'll need for a future patio. The exact same spec applies: 2-3" compacted ABC, 1" C-33 sand bed, polymeric joint sand, edge restraint. Master those four on a 90 sq ft walkway and a 300 sq ft patio becomes the same project, just bigger.
The walkway-specific traps
Walkways have two failure modes patios don't share. First: edge migration — without restraint on BOTH sides, the pavers spread sideways the first time a wheelbarrow, bike, or stroller rolls across. Patios have a perimeter that mostly stays put; walkways have two long edges, both under stress. Second: pitch direction. A walkway runs FROM somewhere TO somewhere, and the pitch (drainage) has to go to the right side. Always pitch away from the house, not along the walkway's length — water needs to come OFF the walkway, not run down it.
When you should hand this one to us
- Driveway pavers — different spec entirely (4-6" ABC, vehicle-load edge restraint, herringbone pattern for shear resistance).
- Walkways with steps, level changes, or that integrate with retaining walls.
- Curved walkways over 30 ft long — the cuts get expensive and the layout precision benefits from a pro.
- Front-of-house walkways where the finish quality is on display from the street.
Tools you'll need
- Plate compactor (vibratory)Rentable3,000 lb force class minimum. The single most-skipped tool — and the #1 reason DIY walkways settle.$70/day rental · $700 buy
- Hand tamper (8x8 steel)For tight spots and edges where the plate compactor won't reach.$45
- Wet saw or paver splitterRentableTrim end-cuts at gates, posts, and curves.$55/day rental
- Rubber mallet (white)Seats pavers without scuffing.$15
- Screed pipes (1" EMT, 2x 10 ft)Rails for screeding the 1" sand bed.$12 pair
- Screed board (straight 2x4)Pulls flush with screed pipes.$8
- 4-ft level + string line + stakesAlignment and slope (1/4" per ft away from house).$45
- Wheelbarrow + flat shovel + landscape rakeStandard material-moving kit.$140
- Leaf blower (small)Clears polymeric joint sand off paver faces before activation.$80 (own)
- Garden hose with mist nozzleActivates the polymer in joint sand.$30
- Knee pads + gloves + safety glassesDon't skip the knee pads. Trust us.$60
Rentable items are available at most Home Depot / Sunbelt locations by the day.
Materials
- ABC (Aggregate Base Course)Canonical walkway spec: 2-3" compacted. NEVER quarter minus — that's a turf base.A 3-ft x 30-ft walkway (90 sq ft) at 3" compacted ≈ 1.5 tons. Order 2 tons.$35–$50 per ton delivered
- C-33 concrete sand1" sand bed, screed exactly. Bagged or bulk.$8–$12 per cu ft bag · $40/ton bulk
- Pavers (rectangular or modular)Belgard, Pavestone, Acker-Stone, Techo-Bloc. Plan 5% waste for cuts.$3.50–$8 per sq ft
- Polymeric joint sandAlliance Gator Maxx, Techniseal HP NextGel. Locks joints, blocks weeds.$35–$50 per 50 lb bag (covers ~80 sq ft)
- Plastic edge restraint + 10" spikesSnap-Edge or Pave Edge Rigid. Non-negotiable on both sides of the walkway.$8 per 8 ft section
- Woven landscape fabricGoes between subgrade and ABC.$50 for 4×100 ft roll
- Marking paint + flagsLayout.$15
Realistic DIY material + rental cost for a 90 sq ft (3 ft × 30 ft) walkway: $550-$1,100 depending on paver selection. Pro install for the same walkway: $1,800-$3,200.
- 01
Layout & call 811
Spray-paint the walkway outline. Call Arizona 811 (free, required) at least 2 business days before digging. Walkways frequently cross irrigation laterals and low-voltage lighting wire — both are easy to repair if you know they're there, expensive when you find them with a shovel.
- 02
Excavate the trench
Total dig: 1" sand + paver thickness (~2-3/8") + 3" ABC = roughly 6.5" below your final walkway height. Make the trench 6" wider than your finished walkway on each side to give the edge restraint room to anchor.
- 03
Subgrade compaction & fabric
Compact bare subgrade with the plate compactor in two perpendicular passes. Lay woven landscape fabric edge-to-edge across the trench bottom, lap any seams 6".
- 04
Place and compact ABC in lifts
Spread ABC in 1.5" lifts. Compact each lift separately (the plate compactor only fully consolidates the top 2" of any one lift, so two thin lifts beat one thick one). Mist with water between lifts. Final compacted depth: 2-3". Slope subgrade and ABC together away from any adjacent structure at 1/8-1/4" per foot.
- 05
Set screed pipes and screed the sand bed
Two 1" EMT pipes parallel down the walkway, ~3-4 ft apart. Pour C-33 sand between them, screed flush with a 2x4. Lift pipes, hand-fill the channels with sand. Do not walk on the screeded bed.
- 06
Lay pavers — start at one end, work outward
Set pavers tight, no spacing. Tap each one home with the rubber mallet. Check pattern and edge alignment every 4-5 rows. Make end-cuts and angle cuts last with the wet saw.
- 07
Install edge restraint on BOTH sides
Walkways migrate sideways the moment a kid drags a bike across. Snap the L-channel against the outside row on each side and drive 10" spikes through it every 12". This is the part most DIY walkways skip — and the reason their pavers spread open at the joints by year two.
- 08
Sweep and compact pavers
Sweep coarse sand into joints. Lay a 1/4" rubber pad or sacrificial plywood over the walkway and run the plate compactor over the entire surface, two perpendicular passes. This locks every paver into the sand bed.
- 09
Polymeric joint sand
Pour, sweep into joints until full, then BLOW (leaf blower, low setting) every grain off the paver faces. Any haze left will set permanently. Mist with a hose in light, repeated passes until the surface stays wet for 30 seconds. Cures hard in 24 hours.
- 10
Cure & enjoy
Keep traffic off for 24 hours. After 30 days you can apply a paver sealer if you want richer color and less long-term maintenance. Re-seal every 12-18 months in AZ sun.
Pro tips from our crew
- Walkways are the BEST first paver project — small footprint, fast win, real skills banked for a future patio.
- If you're connecting two existing surfaces (house slab to driveway), get the start and end elevations right BEFORE digging. Use a string line at both ends and dig to it.
- For a curved walkway, lay the pavers first, then mark the curve with marking paint on top of the pavers, then cut all the perimeter pieces at once on the wet saw. Don't cut piecemeal.
- Pull pavers from 3-4 cubes at once and blend — single-cube laying creates visible color bands.
- Work in the morning. Polymeric sand activation gets sketchy above 95°F ambient.
- Buy 10% extra pavers. Returns are a pain; running out at hour 4 is worse.
Common DIY mistakes we get called to fix
- Quarter minus or decomposed granite as the base. Pavers need ABC; settling is inevitable with DG.
- Skipping the plate compactor and 'tamping with a 4x4.' Expect visible sinking by year two.
- Edge restraint on only one side, or none at all. The walkway spreads, weeds invade joints, pavers wobble.
- Mason or play sand for the bedding instead of C-33 concrete sand. Mason sand holds water; you get a soggy, unstable bed.
- Skipping landscape fabric. Fines from the subgrade pump up through the base over time and the walkway shows 'tea bag' settling around stress points.
- Polymeric sand activated with a flood spray. Washes the polymer out of the joints — empty joints in 6 months.
- Walkway pitched toward the house instead of away from it. Monsoon water now drains into your foundation. Always slope away.
If your walkway starts feeling like more than a weekend, that's normal.
Most homeowners who start one of these projects finish it. Some realize halfway in that the prep, the equipment rental, or the physical scale isn't worth their Saturday. No judgment — we built our business on doing it right the first time. If you'd rather hand it off (or you've started and want a clean takeover), send a few photos and we'll quote it honestly.
Common questions.
Want a curved walkway, driveway pavers, or steps?
Curves over 30 ft, anything with level changes, and all driveway work are where pro install starts winning on time and finish quality. Send a few photos and dimensions — we'll quote it honestly.
Get a Walkway QuoteWhy this is an investment, not a cost.
An AE backyard is engineered to add daily livability and long-term home value. We publish honest ranges and build to code with a licensed and bonded Arizona crew. AE provides project-specific workmanship and manufacturer-warranty information in the signed agreement. Website summaries are for planning only.
- Licensed, bonded & insured in Arizona. ROC 340966 (R-62) · ROC 341002 (R-3) · ROC 347738 (KA-5) · ROC 211530 (CR-21). Most Arizona contracting work valued at $1,000 or more — or requiring a permit — must be performed by a properly licensed contractor, subject to statutory exemptions. Verify the legal entity, license status, and classification with the Arizona Registrar of Contractors.
- Real ranges, itemized scope. You see materials, finishes, equipment models, and a line-item budget before you sign — not a one-line "pool — $90,000."