Build a gas or wood fire pit HOA-friendly. Safe. Yours by Sunday.
A 36-48 inch paver-block fire pit is one of the most rewarding outdoor projects you can build in a weekend — and one of the few where the safety stakes are real. Get the setbacks right, get the gas leak test right, get the drainage right, and you've added daily-use ambiance to your yard for the next 20+ years.
Wood vs gas — pick early, it changes everything
Wood-burning is simpler to build (no gas work, no leak testing) but harder to live with (smoke, ash, HOA restrictions, burn-ban months). Gas is more complex to build (line tap, leak test, burner pan, drainage) but vastly easier to use (instant on, no cleanup, HOA-friendly). For Arizona suburban backyards we recommend gas roughly 10:1 over wood — but if you live somewhere a wood fire is the point (rural, mountain property), wood it is.
The non-negotiables for gas pit safety
Three rules. (1) Tap only into an accessible existing appliance line (water heater stub, BBQ stub, range stub) — never a main run, never inside a wall. New main runs need a licensed plumber and a permit, always. (2) Key valve on the OUTSIDE of the pit wall — you must be able to shut off gas without reaching over flame. (3) Leak-test every joint with soap solution before first light. Bubbles = leak. No bubbles = ok to light. This is 30 seconds of work that prevents a hospital trip.
When you should hand this one to us
- Pits over 48" diameter, multi-tier seating walls integrated with the pit, or pits built into a larger paver or hardscape design — the design coordination is where pros earn the fee.
- Any gas pit requiring a new gas line run from the meter or main — needs licensed plumber and permit; we coordinate the trades.
- Custom fire features (linear fire tables, fire & water combinations, bowls) — different build entirely, often steel + concrete + custom fab.
- Pits on raised decks, second-story patios, or anywhere fire codes get specific.
Tools you'll need
- Plate compactorRentableCompact base under footing.$70/day rental
- Wet saw (for capstones)RentableClean cuts on natural stone or paver caps.$55/day rental
- 4-foot level + torpedo levelEvery ring of block has to be level — errors compound.$45
- Construction adhesive gun (10:1 ratio)For PL Premium or SRW Liquid Cement Color adhesive.$15
- Wheelbarrow + shovel + rubber malletStandard install kit.owned
- Pipe wrench + thread sealant (gas pit only)Stub-out connections.$30
- Manometer or soap-test bottle (gas pit only)Leak-test every gas joint before lighting. Non-negotiable.$25
Rentable items are available at most Home Depot / Sunbelt locations by the day.
Materials
- Retaining-wall block (Belgard Celtik, Pavestone RumbleStone, or similar)Tapered face block that forms a ring naturally. Typically 36-48" inside diameter, 14-18" tall (3-4 courses).$3.50–$6 per block (need 36-60 depending on diameter and height)
- Capstones / wall capsTop course — flat caps that overhang slightly. Belgard, Pavestone, Acker-Stone.$8–$15 per linear ft of perimeter
- Polyurethane masonry adhesive (PL Premium or SRW)Bonds every block. Two tubes per fire pit.$10 per tube
- Steel fire ring (wood-burning pit)32-39" diameter, 12 gauge minimum. Protects block from spalling.$80–$180
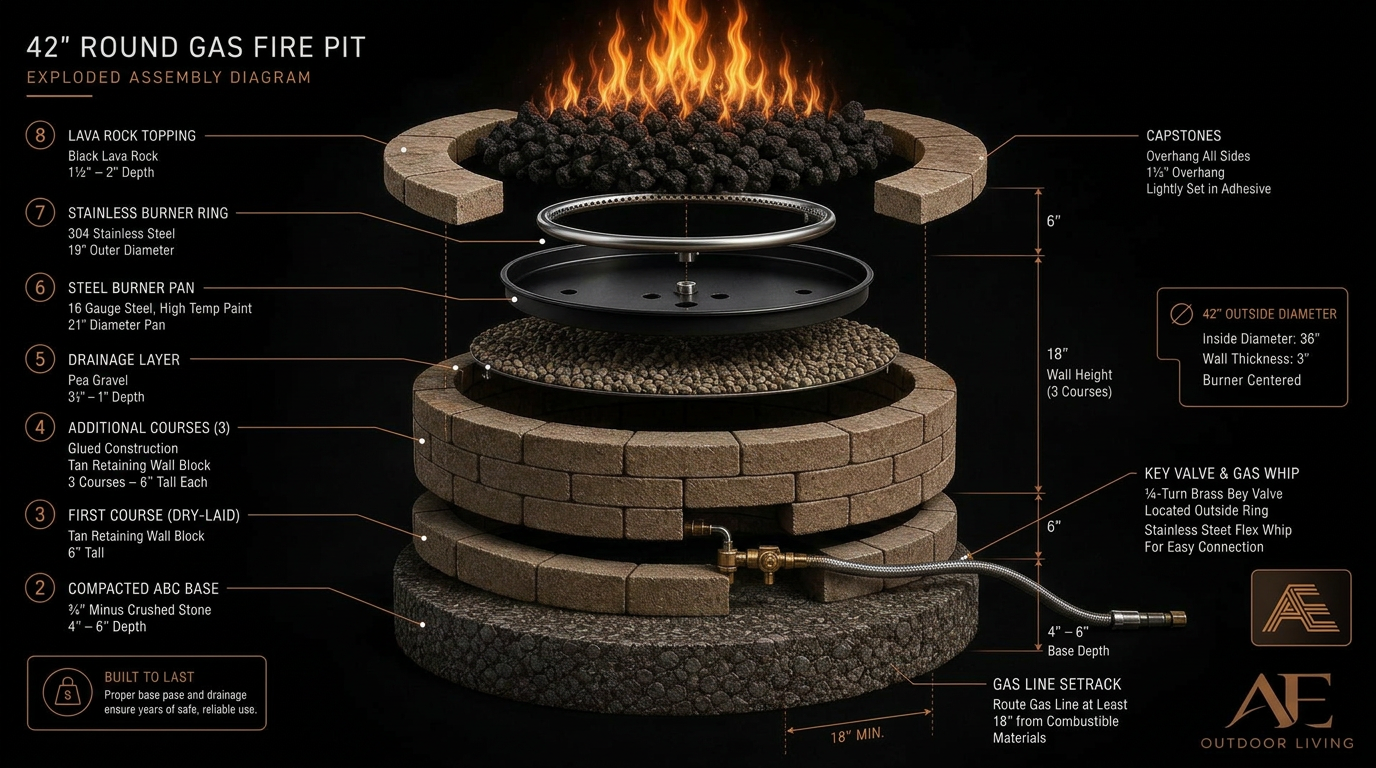
- Gas burner ring + pan + key valve (gas pit)Stainless burner sized to pit diameter, drop-in steel pan, 1/4-turn brass key valve, flexible whip.$250–$550 kit
- Lava rock or fire glass (gas pit fill)Decorative top layer over burner pan. Lava rock = cheap and rustic; fire glass = modern.$30–$120 (40 lb)
- ABC base material4" compacted base under the footing area.$35–$50 per ton (need ~1 ton)
- Pea gravel (drainage layer, gas pit only)Inside the pit under the burner pan for drainage and air circulation.$8 per bag
Realistic DIY material cost: $350-$800 wood-burning · $800-$1,800 gas (depending on burner kit and existing gas line proximity). Pro install for an equivalent freestanding gas pit: $2,500-$5,500. Custom fire tables and integrated seating walls scale from there.
- 01
Choose location and check setbacks
AZ general rule of thumb: 10 ft from any structure (house, shed, fence, pergola), 25 ft from a property line, never under a tree canopy (overhead branches cooked by heat), never on a wood deck without a heat-shield mat. HOA ARC will usually approve if it's gas, paver-built, and in the backyard — submit plans first. Wood-burning may not be allowed in some HOAs at all.
- 02
Mark the footprint
For a 42" inside-diameter pit with one block course thickness, the outside diameter is roughly 54". Mark a 60" circle on the ground for the base footprint (gives you 3" of base extending past the block ring on all sides). Spray paint or marking flags.
- 03
Excavate and compact base
Dig 6" deep across the full 60" circle. Place 4" of ABC, compact in two lifts of 2" each. Final compacted surface 2" below grade — so the bottom course of block sits 2" recessed for stability.
- 04
Dry-lay the first course
Set the first ring of tapered blocks tight against each other, no adhesive yet. Adjust until the ring is perfectly circular and every block is level both directions. This is the most important course — if it's wrong, every course above is wrong.
- 05
Glue and stack subsequent courses
Run a 1/4" bead of polyurethane masonry adhesive on top of course 1, set course 2 with each block bridging the seam below (running bond — never stack joints). Check level on every block. Repeat for courses 3 and 4.
- 06
Cut and set capstones
Cap stones overhang the inside and outside of the wall by roughly 1". Wet-saw cuts for fit at corners or where caps don't meet evenly. Adhere with the same urethane glue, weighted with a brick while setting.
- 07
(Gas pit) Stub gas line and install burner
Tap into an existing accessible gas line — either a pre-stubbed BBQ/pit line or extend from an existing gas appliance (water heater or stove). NEVER tap into a main run without a licensed plumber and a permit. Run 3/8" or 1/2" black iron or CSST flex line up through the pit floor, terminate at a 1/4-turn brass key valve on the EXTERIOR of the pit wall (so you can shut it off without reaching over flames). Connect flex whip to the burner. Apply leak-test solution to every joint — bubbles = leak. No bubbles = safe to light.
- 08
(Gas pit) Drainage layer + burner pan + media
Lay 2-3" of pea gravel inside the pit (drainage and combustion air). Set burner pan level on top. Position burner ring centered in pan. Fill around burner with lava rock or fire glass to the top of the burner. Do NOT bury the burner ports.
- 09
(Wood pit) Set steel fire ring
Drop the steel ring inside the block walls. The ring protects the block from heat spalling and gives you a cleaner burn area. Don't skip it — direct flame against concrete block cracks the inner face within 5-10 burns.
- 10
First fire test
Gas: open the key valve halfway, light with a long lighter from above. Adjust flame height with the key valve. Listen for hissing (leak), look for yellow tipping (air mix wrong, may need a different burner). Wood: small starter fire first — let the block ring heat up gradually before a full burn.
Pro tips from our crew
- For a gas pit, plan the key valve location BEFORE you set the second course of block. You need to cut a notch or route the line so the valve sits accessible on the outside.
- Round pits give the most even heat distribution; square/rectangular pits look more architectural but have hot/cold corners.
- Always cap-overhang on both sides — pure flush caps look unfinished. 1" overhang inside and out is the standard.
- Gas line size matters: a 65,000 BTU burner needs at least 1/2" line if running more than 15-20 ft from the meter. Under-sized line starves the burner and you get weak flame.
- Buy 10% extra blocks. Color variation between pallets is real and you'll want to blend.
- If pit location is on existing pavers, you DO NOT need a separate footing for a fire pit under ~6 ft diameter — the existing paver base handles it. Glue blocks directly to the pavers with urethane adhesive.
Common DIY mistakes we get called to fix
- Tapping into a main gas line yourself instead of an accessible appliance stub. Illegal in every Arizona jurisdiction without a permit and licensed plumber — and the failure mode is a house fire or explosion.
- Forgetting the drainage layer in a gas pit. Rainwater pools on the burner pan, rusts it out in one season, and clogs the ports.
- No key valve on the exterior. You have to reach over an active flame to shut it off — bad day waiting to happen.
- Stacking blocks without running bond (joints aligned vertically). The ring is structurally weaker and visually amateur.
- Wood-burning pit with no steel fire ring. Block inner face spalls and cracks; you're replacing it in two seasons.
- Pit under a tree canopy. Branches scorch and can ignite at 12+ ft above the flame.
- Pit too close to the house or pergola (less than 10 ft). HOA flags it, insurance flags it, and you've created a real fire risk.
- Skipping the leak test on gas joints. Soap-bubble test takes 30 seconds and prevents the call no one wants to make.
If your fire feature starts feeling like more than a weekend, that's normal.
Most homeowners who start one of these projects finish it. Some realize halfway in that the prep, the equipment rental, or the physical scale isn't worth their Saturday. No judgment — we built our business on doing it right the first time. If you'd rather hand it off (or you've started and want a clean takeover), send a few photos and we'll quote it honestly.
Common questions.
Want a built-in seating wall, linear fire table, or fire & water feature?
Custom fire features are some of our favorite projects to design — integrated with your patio, lit at night, ready for daily use. Send us a few photos of your space.
Get a Fire Feature QuoteWhy this is an investment, not a cost.
An AE backyard is engineered to add daily livability and long-term home value. We publish honest ranges and build to code with a licensed and bonded Arizona crew. AE provides project-specific workmanship and manufacturer-warranty information in the signed agreement. Website summaries are for planning only.
- Licensed, bonded & insured in Arizona. ROC 340966 (R-62) · ROC 341002 (R-3) · ROC 347738 (KA-5) · ROC 211530 (CR-21). Most Arizona contracting work valued at $1,000 or more — or requiring a permit — must be performed by a properly licensed contractor, subject to statutory exemptions. Verify the legal entity, license status, and classification with the Arizona Registrar of Contractors.
- Real ranges, itemized scope. You see materials, finishes, equipment models, and a line-item budget before you sign — not a one-line "pool — $90,000."