Light your yard like a designer. No electrician required.
Low-voltage landscape lighting is the single highest-ROI DIY outdoor project you can take on. A weekend, a multi-tap transformer, the right wire gauge, and warm 2700K LED fixtures will transform your backyard more than $20k of hardscape ever could. This is the real install spec — no shortcuts, no daisy-chain disasters.
Why landscape lighting is the highest-ROI DIY outdoor project
A $1,500 lighting DIY transforms a backyard the same way a $20,000 hardscape build does — but you can install it in a weekend with no permits, no inspections, and no crew. Of every DIY project on this site, this is the one with the biggest 'before and after' gap relative to investment. Done well, it makes the rest of your yard finally readable at night.
The two design rules that separate good from bad
First: light destinations, not paths. People remember the uplit tree, the washed wall, the glowing water feature — not the path lights. Path lights are a supporting actor; the focal lighting is the show. Second: warm color temperature only. 2700K reads as 'home,' 3000K reads as 'commercial,' anything cooler reads as 'institutional.' Mixed color temperatures across one yard look amateur — pick one and stick with it.
When you should hand this one to us
- Permanent track-mounted holiday lights along the roofline — AE LEDs is a year-round programmable RGBW system; we install it integrated with your landscape lighting design.
- Yards over ~1/2 acre — wire runs get long, voltage-drop math gets complex, transformer sizing benefits from a real load calc.
- Custom features (water features, fire features, large feature trees) where you want gallery-level lighting design.
- Integration with smart home (Lutron, Control4, Savant) or with pool automation — wiring and protocol work needs a pro.
Tools you'll need
- Wire stripper / crimper12-2 and 10-2 stranded landscape wire.$25
- Trenching shovel (narrow blade)Cuts a 4-6" deep slit for wire burial.$45
- MultimeterVerify voltage at each fixture (you need 10.8-12V at the fixture). The whole game is voltage drop.$30
- Wire nuts (waterproof gel-filled, DryConn brand)Never use regular twist-nuts — they corrode and fail in monsoon season.$15 for 25-pack
- Cordless drill + hole saw bitFor mounting transformer to wall or post.owned tool
- Lighting design printout or sketchHand-draw your yard, mark every fixture location, calculate run distances. The design saves you 80% of the troubleshooting.—
Rentable items are available at most Home Depot / Sunbelt locations by the day.
Materials
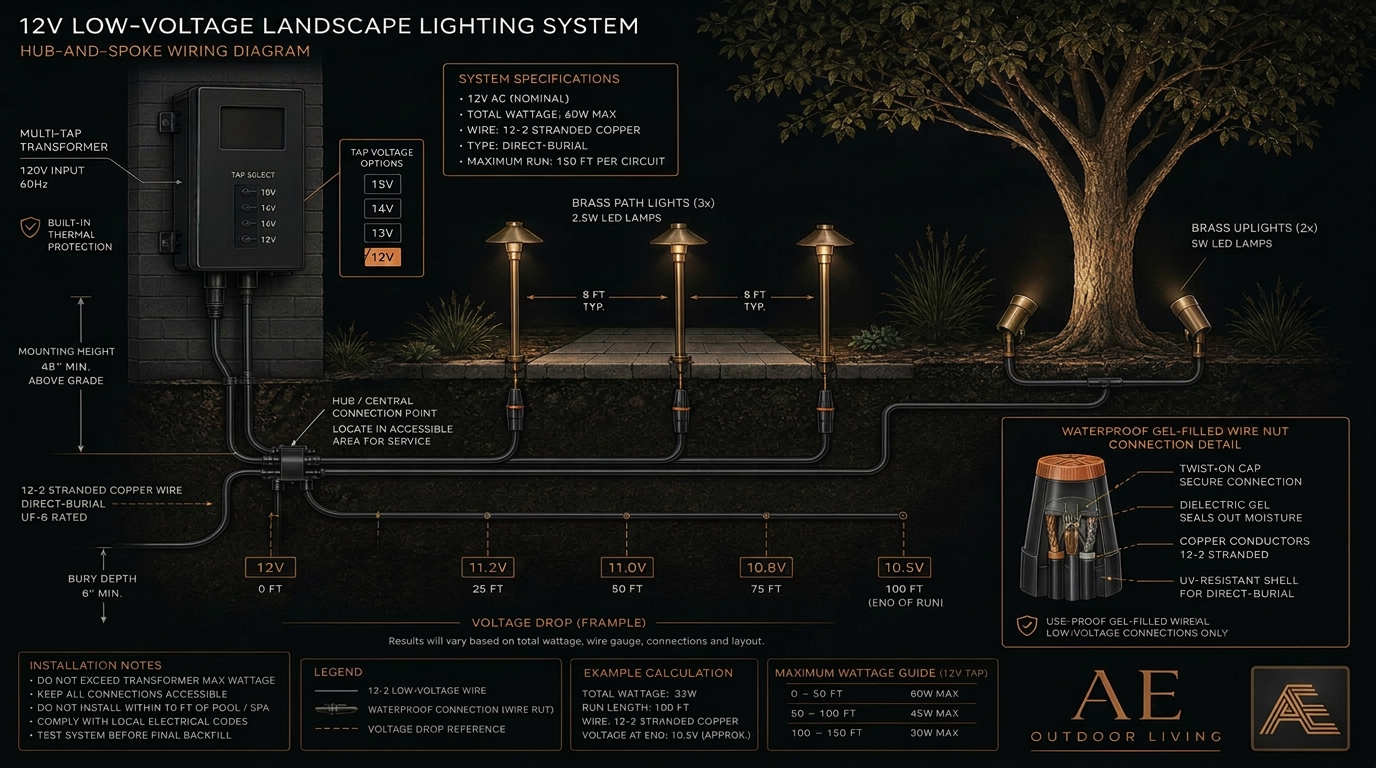
- Low-voltage transformer (multi-tap, 12V/13V/14V/15V)Size at 80% of fixture wattage total. 300W transformer = 240W max load. Multi-tap is critical — you boost output voltage on long runs to compensate for drop.$180–$450 (150W–600W). Kichler, FX Luminaire, Volt.
- Direct-burial low-voltage wire12/2 for runs under 100 ft and loads under 100W. 10/2 for anything longer or higher load. Never use 14/2 — it's only rated for very short, low-load runs and DIY installs always grow.$0.80–$1.40 per ft
- Path lights (LED, 3W–4W each)MR16 LED bulb, brass or copper housing for AZ longevity. Skip plastic — it cracks in 2 summers.$45–$120 each
- Up-lights / well-lights (LED, 4W–7W each)For trees, walls, accents. Cast aluminum or brass body.$60–$180 each
- Hardscape / step lights (LED)Surface-mount or recessed under cap stones.$50–$120 each
- Photocell or astronomical timerOn the transformer. Photocell = on at dusk, off at dawn (simple). Astro timer = scheduled, more flexible.$40 (photocell) · $120 (smart timer)
- Stake/spike for each path lightUsually included; replace cheap plastic with brass spikes if available.included
Realistic DIY install cost: $500 (small front yard, 8 fixtures, basic transformer) to $2,500 (mid backyard, 20+ fixtures, smart timer, multi-tap transformer). Pro design + install for the same scope runs $2,500–$8,000 — the delta is design time and lifetime warranty on the fixtures.
- 01
Design first — sketch your yard
Hand-draw your yard from above. Mark every fixture location: path lights every 8-10 ft along walkways, up-lights at the base of trees and architectural features, step lights on every level change, accent lights on focal plants. Count fixtures, sum the wattage.
- 02
Calculate transformer size
Total fixture wattage × 1.25 = minimum transformer size. Example: 12 fixtures × 5W = 60W × 1.25 = 75W minimum, so buy a 150W transformer (gives you headroom to add more later — every install grows).
- 03
Plan the wire runs (this is where DIY usually fails)
DO NOT run every fixture in series down one long wire. Use a 'T' or 'hub' method: one short main run from the transformer to a central point, then split into multiple shorter branches each carrying 4-6 fixtures. The longest single branch should be under 100 ft for 12/2 wire, under 150 ft for 10/2. Voltage drop is real — at 100 ft on 12/2 carrying 50W, you've dropped from 12V to roughly 10.5V and the last fixture is visibly dim.
- 04
Mount the transformer
Outdoor-rated, GFCI-protected receptacle within 6 ft. Mount the transformer 12" off the ground minimum (monsoon water), on a wall or stout post. Plug it in but DON'T turn it on yet.
- 05
Trench and run main wire
4-6" trench from transformer to first hub or fixture cluster. Stranded direct-burial wire only. Leave a 12" service loop at the transformer and at each fixture so you can pull slack later.
- 06
Install and wire each fixture
Strip both fixture leads and the main wire jacket, twist together, fill a DryConn waterproof gel wire nut completely, screw it onto the joined wires until gel oozes out. THIS is your weatherproof connection. Standard wire nuts last about 6 months in AZ soil before they fail.
- 07
Power up and check voltage at every fixture
Turn on the transformer. With the multimeter set to AC volts, touch the probes to the two screw terminals INSIDE each fixture housing. You want 10.8-12V at every fixture. Below 10.5V = voltage drop is too high; you need to bump the transformer tap from 12V to 13V or 14V (multi-tap transformers let you do this with a single wire move). Above 13V = move down a tap to protect bulb life.
- 08
Backfill and aim
Cover the trenches, set photocell or program timer, then come back at dusk to aim every fixture. Aiming is where lighting becomes design — uplighting a tree at 30° from the trunk vs straight up gives totally different effects.
- 09
Final inspection
Walk the yard at night. Look for: glare from any direction (re-aim), dark spots between path lights (add a fixture), and 'hot spots' on walls (shield or move). A good lighting install is the one you don't notice — you only notice what it's lighting.
Pro tips from our crew
- Less is more. Start with fewer fixtures than you think you need; you can always add. Over-lit yards look like used-car lots.
- Light the destination, not the path. Trees, walls, water features, focal architecture — those are what people notice. Path lights are utilitarian.
- Warm 2700K color temperature for residential. 3000K reads as 'commercial.' Anything cooler than 3000K looks like a parking garage.
- Always buy a multi-tap transformer. Single-tap (12V only) gives you no way to compensate for voltage drop on long runs.
- Run wire on the 'T' method or hub-and-spoke, never a single long daisy chain. The last fixture on a daisy chain is always dim by year two as connections oxidize.
- Brass and copper fixtures patina beautifully in AZ. Aluminum is fine. Plastic cracks in 2-3 summers, period.
Common DIY mistakes we get called to fix
- Using 14/2 or 16/2 wire instead of 12/2 or 10/2. Insufficient gauge = voltage drop = dim, flickering, dead fixtures.
- Standard wire nuts instead of waterproof gel nuts. Connections corrode underground and fixtures die one by one.
- One long daisy-chain run instead of branched runs from a hub. Last fixture is at 8V and visibly dim.
- Undersized transformer — running at 95-100% capacity. Cuts transformer life in half. Always run under 80% loaded.
- Burying wire too shallow (under 3"). Lawn aerators and a stray shovel will cut it.
- Plastic path lights and aluminum stakes. Both fail visibly in 18-36 months of AZ sun.
- All path lights, no up-lighting. The yard reads as 'lit walkways with a dark backyard' instead of designed.
- Cool 4000K+ color temperature. Makes a beautiful backyard look like a Walmart parking lot.
If your lighting plan starts feeling like more than a weekend, that's normal.
Most homeowners who start one of these projects finish it. Some realize halfway in that the prep, the equipment rental, or the physical scale isn't worth their Saturday. No judgment — we built our business on doing it right the first time. If you'd rather hand it off (or you've started and want a clean takeover), send a few photos and we'll quote it honestly.
Common questions.
Want permanent holiday lights or a designer-level lighting plan?
AE LEDs (track-mounted RGBW year-round) and integrated landscape designs are what we do every day. Send a few photos of the front and back of your home — we'll mock up a design.
Get a Lighting Design QuoteWhy this is an investment, not a cost.
An AE backyard is engineered to add daily livability and long-term home value. We publish honest ranges and build to code with a licensed and bonded Arizona crew. AE provides project-specific workmanship and manufacturer-warranty information in the signed agreement. Website summaries are for planning only.
- Licensed, bonded & insured in Arizona. ROC 340966 (R-62) · ROC 341002 (R-3) · ROC 347738 (KA-5) · ROC 211530 (CR-21). Most Arizona contracting work valued at $1,000 or more — or requiring a permit — must be performed by a properly licensed contractor, subject to statutory exemptions. Verify the legal entity, license status, and classification with the Arizona Registrar of Contractors.
- Real ranges, itemized scope. You see materials, finishes, equipment models, and a line-item budget before you sign — not a one-line "pool — $90,000."