Build a real drip zone in an afternoon. Save thousands of gallons a year.
Drip irrigation is the highest-impact, lowest-risk DIY project on this site. No electrical work, no permits, no heavy equipment — just a hose bib, a regulator, a filter, and the right emitters at the right plants. A single zone is a $150-$400 weekend project that pays for itself in water savings inside one summer.
Drip irrigation is the most DIY-friendly outdoor project
Zero electrical work. No permits. No heavy equipment. The whole system runs on hose-bib pressure, regulated down. You can finish a real drip zone in an afternoon for $150-$400 in parts, and the water savings vs. spray irrigation (or hand-watering) pay it back in one summer. It's the single project on this site we'd recommend to anyone who's never picked up a tool.
Why pressure-compensating emitters matter so much in AZ
Phoenix municipal pressure ranges 45-70 PSI; your specific yard might range 20-45 PSI across the day depending on neighborhood demand. Standard emitters flow more under higher pressure and less under lower pressure — so the first plant on your line might get 3x the water of the last plant on the line, and you'd never know unless you measured. Pressure-compensating emitters flow their rated GPH whether the line is at 20 PSI or 50 PSI. Every emitter you buy should say 'PC' on the package. Skip this and your install becomes a guessing game.
When you should hand this one to us
- Whole-yard automatic irrigation with multiple zones, valves, and a wall-mounted controller — the wiring and valve manifold work benefits from pro install.
- Integration with a new landscape design (we plant, then we set drip during install — much cleaner than retrofitting).
- Sprinkler-to-drip conversion across an entire existing landscape — labor scales with the number of heads to cap.
- Smart irrigation system tied to your home automation, pool controller, or with leak-detection cutoffs.
Tools you'll need
- Tubing punch (hole punch for 1/4" emitters)Makes clean holes in 1/2" mainline. A nail will work but leak.$10
- Sharp scissors or tubing cutterClean cuts on poly tubing.$15
- Pliers (for compression fittings)Pressing fittings home.owned tool
- Tape measure & marking flagsMark each plant location before you start running tubing.$15
- Goof plugs (50-pack)For when you punch a hole in the wrong spot. You will.$5
- Bucket + measuring cupVerify emitter GPH at install — catch the output for 60 seconds, multiply by 60.owned
Rentable items are available at most Home Depot / Sunbelt locations by the day.
Materials
- Pressure regulator (25–30 PSI)Drip systems run at low pressure. Skip this and your emitters blow off the tubing.$15
- Backflow preventer (anti-siphon)Required by AZ code anywhere drip ties into potable water.$15
- Filter (150-mesh or finer)Phoenix water has fine sediment that clogs emitters within months without filtration.$20
- 1/2" poly mainline tubing (700 series, 100-ft roll)The backbone. Black UV-resistant poly. NOT vinyl, NOT clear.$30 per 100 ft
- 1/4" distribution tubing (50-ft roll)From mainline to each plant.$8 per 50 ft
- Pressure-compensating emitters (0.5, 1, 2 GPH)Pressure-compensating is non-negotiable in AZ — they emit the rated GPH whether your line pressure is 20 or 40 PSI. Brand: Netafim, Rain Bird XB, DIG.$0.40–$0.80 each
- Compression fittings (tees, elbows, couplers)Connect mainline runs.$1–$3 each
- End caps + flush valvesEvery line gets a flush valve at the far end — open monthly to clear sediment.$3 each
- Tubing stakes (1/4" hold-downs)Stake 1/4" lines so they don't wander.$10 for 50
- Timer (battery, hose-bib type)Rain Bird, Orbit, or Rachio. Smart timers give weather-based watering.$30 (basic) · $180 (smart hub)
Realistic DIY material cost: $120-$400 per zone depending on plant count. Pro install for a multi-zone system with wall-mounted controller and valve manifold: $1,800-$5,000+. For a single zone off a hose bib, DIY math is overwhelming.
- 01
Map zones and plant water needs
Group plants by water need: high (vegetables, citrus), medium (most shrubs), low (native cacti, desert trees). Each group should be on its own zone — never put a cactus and a citrus on the same line. Mark each plant and its target GPH on a sketch. Mature trees: 10-20 GPH. Shrubs: 1-4 GPH. Annuals: 0.5-1 GPH each.
- 02
Assemble the head
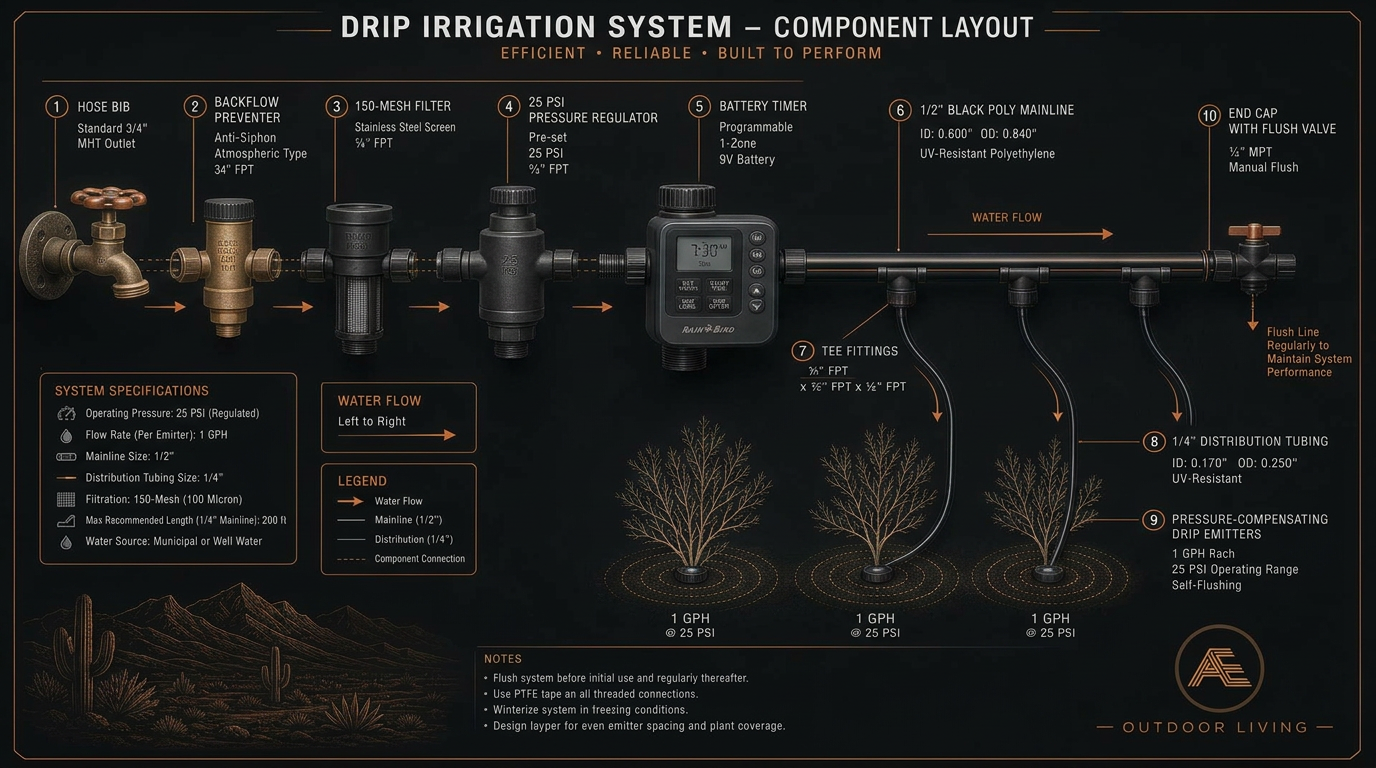
Hose bib → backflow preventer → filter → pressure regulator → timer (or before regulator, depending on timer type) → 1/2" mainline adapter. Threads should be hand-tight + 1/4 turn with a wrench, sealed with Teflon tape. Test for leaks before going further.
- 03
Lay out the mainline
Run 1/2" mainline across your zone in a loop or branched layout. Don't run a single long line to the far corner — pressure drops the longer the run. Stake the mainline loosely so you can adjust as you punch emitters.
- 04
Punch emitter holes at each plant
Use the punch tool — twist in, twist out. Insert a 1/4" barbed fitting OR a 1/4" tubing adapter into the hole. From there, run 1/4" distribution tubing 1-6 ft to the plant base.
- 05
Install emitters
At each plant, install the emitter at the END of the 1/4" tubing (or directly into the mainline for plants right on the line). For trees, ring 2-3 emitters around the dripline; for shrubs, one or two emitters at the base; for vegetables, one emitter per plant.
- 06
Install flush valves and end caps
Every mainline run gets a flush valve or removable end cap at the far end. Critical for monthly flushing. Without it, sediment accumulates and the whole system clogs from the far end inward — emitters die one by one with no obvious cause.
- 07
Pressure test
Open the valve fully. Walk every emitter. Catch output in a measuring cup for 60 seconds — should match the emitter's rated GPH within 20%. Any emitter way off rating: it's clogged or you mis-installed it. Replace.
- 08
Program timer and bury (optional)
Set initial schedule: 30-45 min once a day in summer (cooler hours, 4-6am), 20-30 min every other day in winter. Bury mainline 2-4" under mulch or DG — protects from UV and lawn aerators. Don't bury under pavers or concrete unless you've installed a sleeve.
Pro tips from our crew
- Use pressure-compensating emitters only. Standard 'turbulent flow' emitters are cheaper but flow varies with pressure — first plants get drowned, far plants get parched.
- Phoenix water hardness clogs emitters faster than humid climates. Flush every month, replace the filter every 6 months.
- Run drip in early morning (4-6am). Evaporation losses drop, leaf disease drops, water pressure is higher (less demand on city system).
- Mature citrus needs MORE water per session, less often. Twice a week deep watering > daily shallow watering.
- Always install a Y-splitter at the hose bib so you can keep using the bib for a regular hose.
- Buy 30% more 1/4" tubing and emitters than you calculated. You'll add plants, move emitters, and replace clogged ones — having spares means you don't quit at hour 3.
Common DIY mistakes we get called to fix
- Skipping the pressure regulator. 60 PSI household pressure blows emitters off the line within weeks.
- Skipping the filter. Phoenix sediment clogs everything in 3-6 months and the failure looks like 'drip just doesn't work for me.'
- Mixing high-water plants and desert plants on the same zone. Whatever schedule you pick is wrong for half of them.
- Standard emitters instead of pressure-compensating. Output varies 3x along a 100-ft run.
- No flush valves. System dies from the far end inward and you can't diagnose it.
- Burying tubing too deep or under concrete without a sleeve. The day a leak develops, you're chiseling concrete to find it.
- Vinyl 'clear' tubing from the box store. UV-degrades in one Phoenix summer and cracks.
- Watering 'every day for 10 minutes.' Promotes shallow root systems, plant suffers in real heat, repeat next year.
If your irrigation plan starts feeling like more than a weekend, that's normal.
Most homeowners who start one of these projects finish it. Some realize halfway in that the prep, the equipment rental, or the physical scale isn't worth their Saturday. No judgment — we built our business on doing it right the first time. If you'd rather hand it off (or you've started and want a clean takeover), send a few photos and we'll quote it honestly.
Common questions.
Want full-yard automation or a smart irrigation system?
Multi-zone systems with wall-mounted controllers, valve manifolds, and smart-home integration are where pro install really pays off. We design and install whole-property irrigation alongside our landscape work.
Get an Irrigation QuoteWhy this is an investment, not a cost.
An AE backyard is engineered to add daily livability and long-term home value. We publish honest ranges and build to code with a licensed and bonded Arizona crew. AE provides project-specific workmanship and manufacturer-warranty information in the signed agreement. Website summaries are for planning only.
- Licensed, bonded & insured in Arizona. ROC 340966 (R-62) · ROC 341002 (R-3) · ROC 347738 (KA-5) · ROC 211530 (CR-21). Most Arizona contracting work valued at $1,000 or more — or requiring a permit — must be performed by a properly licensed contractor, subject to statutory exemptions. Verify the legal entity, license status, and classification with the Arizona Registrar of Contractors.
- Real ranges, itemized scope. You see materials, finishes, equipment models, and a line-item budget before you sign — not a one-line "pool — $90,000."